Have you ever been out in nature, binoculars pressed to your eyes, watching an incredible bird or a shy deer in the distance? You wish you could capture that moment, pull out your phone, snap a picture, and… all you get is a tiny, pixelated speck that barely resembles what you saw. It’s a frustratingly common scenario for wildlife enthusiasts everywhere. What if I told you there’s an ingenious, budget-friendly “hack” that can transform your smartphone into a super-zoom camera, allowing you to capture stunning close-ups of distant wildlife using the gear you likely already own?
Welcome to the world of digiscoping! This isn’t just a fancy term; it’s a game-changer for hobbyist birdwatchers and nature lovers who want to document their sightings without investing thousands in telephoto lenses. In this comprehensive guide, I’ll walk you through how to get started with wildlife photography using binoculars (digiscoping), step-by-step. Get ready to unlock a whole new level of nature photography!
What Exactly is Digiscoping? (And Why It’s a Game-Changer)
At its heart, digiscoping is elegantly simple: it’s the technique of attaching a digital camera – in our case, your ever-present smartphone – to the eyepiece of an optical instrument, typically a spotting scope or, as we’ll focus on today, your trusty binoculars. Essentially, your binoculars become a powerful telephoto lens, and your phone acts as the digital sensor to record the magnified image.
The benefits are truly revolutionary for the everyday wildlife observer:
- Incredibly Close-Up Shots: Capture intricate details of birds, insects, and mammals that are far too distant for a standard phone camera.
- Utilize Existing Gear: No need for expensive dedicated wildlife photography equipment. If you own binoculars and a smartphone, you’re already halfway there!
- Document Your Sightings: Go beyond mental notes and checklists. Get tangible proof of rare birds, unique animal behaviors, or simply beautiful moments in nature.
- Affordable Entry: This is wildlife photography on a budget, making it accessible to everyone.
It’s a clever “DIY” approach that empowers you to take amazing photos with the gear you already have.
The Essential Gear: Your Digiscoping Starter Kit
Before we dive into the technique, let’s gather our tools. You’ll be surprised how little you need to kickstart your digiscoping journey. This is your foundation for taking pictures through binoculars.
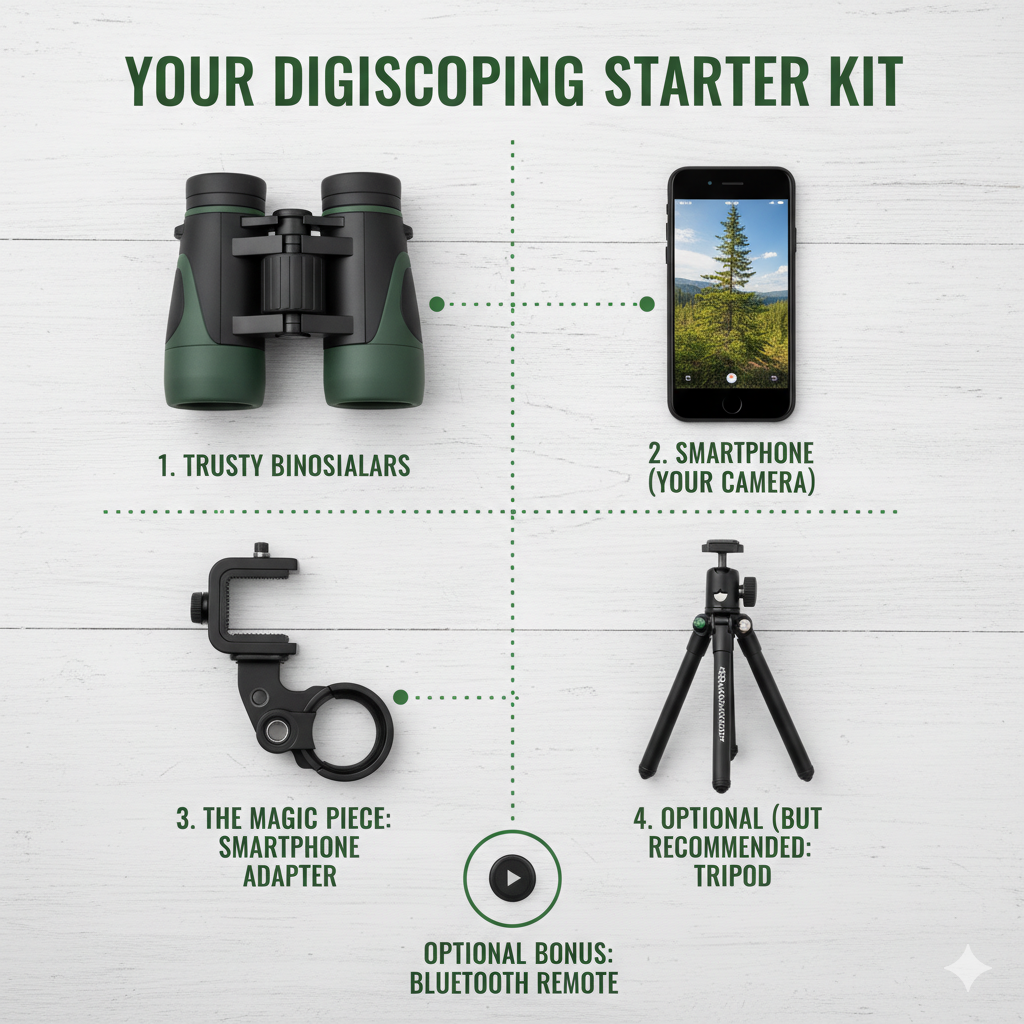
Your Trusty Binoculars
Good news! Any pair of binoculars will work to get you started. If you already have a favorite pair for birdwatching, you’re good to go. However, as you get more serious, consider these points for the best binoculars for digiscoping:
- Magnification: 8x or 10x is often a sweet spot, offering good reach without making the image too shaky. Higher magnifications (e.g., 12x) can be challenging without a very stable setup.
- Exit Pupil: A larger exit pupil (objective lens diameter divided by magnification, e.g., 42mm/8x = 5.25mm) generally makes it easier to align your phone camera with the light path.
- Eye Relief: Long eye relief (the distance from the eyepiece to where your eye should be to see the full field of view) can make alignment easier with some adapters.
Don’t fret too much about these specs initially; just grab what you have and let’s go!
Your Smartphone
Your pocket-sized powerhouse! Modern smartphones boast incredible camera technology, and that’s precisely what makes digiscoping with a smartphone so effective. The quality of your phone’s camera, especially its low-light performance and digital zoom capabilities, will directly impact your results. Make sure your phone is charged – you don’t want to miss that perfect shot!
The Magic Piece: The Smartphone Adapter
This is the most crucial piece of gear, the bridge between your phone and your binoculars. A phone adapter for binoculars securely holds your smartphone in perfect alignment with one of your binocular eyepieces. They typically consist of a clamp that grips your phone and another clamp that attaches to the binocular’s eyepiece.
Look for an adapter that:
- Is universal or compatible with your specific phone and binoculars.
- Is sturdy and made from durable materials.
- Allows for fine adjustments to align your phone camera perfectly.
This adapter is key to stable, clear shots when digiscoping.
Optional (But Highly Recommended): A Tripod
Stability is the secret to sharp photos, especially when you’re dealing with high magnification. While you can handhold your binoculars for digiscoping, a tripod will dramatically improve your image quality by eliminating camera shake. You’ll need:
- A Binocular Tripod Adapter: A small L-shaped bracket that screws into the front hinge of most binoculars (check if yours have a threaded port under a small cap).
- A Tripod: Any standard photography tripod will do. The sturdier, the better.
Seriously, if you want truly crisp results, invest in a tripod. It’s one of the best digiscoping tips and tricks I can offer!
The 5-Step Guide to Taking Your First Digiscoping Photo
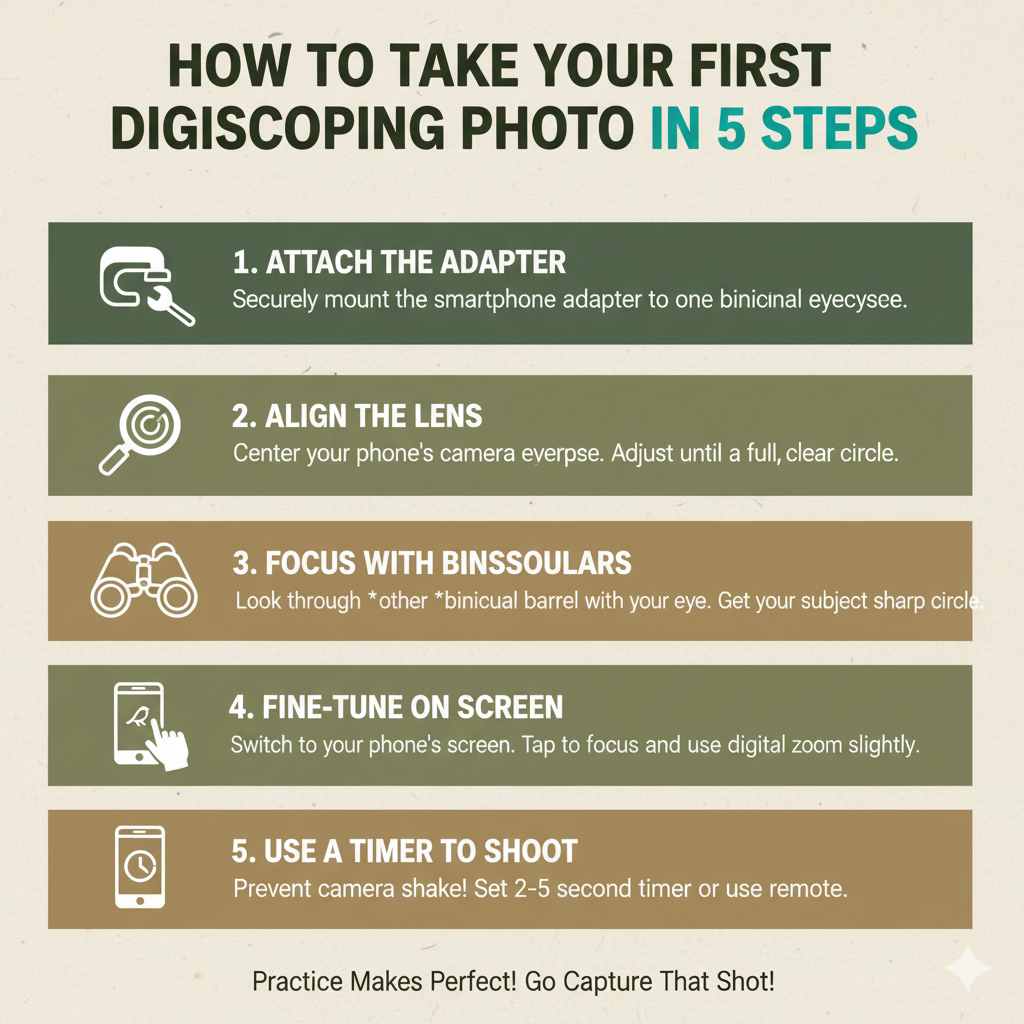
Now for the exciting part! This step-by-step process will guide you through how to take pictures through binoculars, transforming those distant views into memorable photographs.
Step 1: Mount the Adapter to Your Binoculars
First, attach the smartphone adapter to one of your binocular eyepieces. Make sure it’s snug and secure but don’t overtighten it. Next, mount your smartphone into the adapter’s phone clamp. Position your phone so its main camera lens is roughly centered over the adapter’s opening. If using a tripod, ensure your binoculars are securely mounted to it first.
Step 2: Perfectly Align Your Phone’s Camera Lens
This is arguably the trickiest and most critical step for successful digiscoping. Turn on your phone’s camera app. You’ll likely see a black circle (or crescent) with a small, blurry image in the center. Carefully adjust your phone within the adapter (some adapters have fine-tune screws) until the image from the binoculars fills your phone screen as a clear, bright circle. You want the phone lens to be perfectly centered in the light path coming from the binocular eyepiece. Take your time here – good alignment equals better photos.
Step 3: Find Your Subject and Focus with the Binoculars
Before touching your phone’s focus, use your binoculars as you normally would. Locate your subject (that distant bird or animal) and bring it into sharp focus using your binoculars’ central focus wheel. Get the image as crisp as possible through the eyepiece. This is your primary focus control.
Step 4: Fine-Tune the Focus on Your Phone’s Screen
Once the subject is sharp through the binoculars, look at your phone screen. Tap on your subject on the screen to engage your phone’s autofocus. Sometimes, a slight digital zoom (pinch out on the screen) on your phone can help fill the frame and eliminate any dark edges (vignetting) that might be present, as well as sharpen the image further. Avoid excessive digital zoom at this stage, as it can degrade image quality.
Step 5: Snap the Picture (Without the Shake!)
You’re almost there! The biggest enemy of sharpness at high magnification is camera shake.
- Use the self-timer: Set your phone camera to a 2-5 second self-timer. This allows your hand to move away from the phone after pressing the shutter, letting any vibrations settle before the picture is taken.
- Use a Bluetooth remote: Even better, a small Bluetooth remote shutter button (often available for just a few dollars) lets you trigger the shot without touching your phone at all. This is the ultimate shake-prevention method.
Practice this step; it will make a huge difference in the clarity of your wildlife photography!
Pro Tips for Photos That “Wow”
Once you’ve mastered the basics of digiscoping, these advanced digiscoping tips and tricks will help you elevate your images from good to “wow!”
- Good Lighting is Everything: Just like any photography, light is crucial. The best photos are often taken in bright, diffuse light (overcast days) or with the sun behind you, illuminating your subject. Avoid harsh midday sun directly in front of you, which can cause silhouettes or lens flare.
- Get as Close to Your Subject as Ethically Possible: While digiscoping provides incredible reach, the closer you can safely and ethically get to your subject without disturbing it, the better the image quality will be. Less atmospheric distortion, more detail.
- Use Your Phone’s “Pro” Camera Mode: Many smartphones have a “Pro” or “Manual” mode in their camera app. This allows you to control settings like ISO (light sensitivity), shutter speed, and white balance. Experimenting with these can give you more creative control and better results in challenging lighting. A slightly lower ISO can reduce “noise” (graininess) in your photos.
- A Little Post-Processing Goes a Long Way: Don’t expect a perfect image straight out of the camera every time. Basic edits can transform your photos.
- Crop: Crop tightly around your subject to eliminate distracting backgrounds.
- Adjust Brightness/Contrast: Brighten underexposed shots and add a little contrast to make colors pop.
- Sharpen: A subtle sharpening can bring out fine details.
- Most phone photo apps have excellent editing tools, or you can use free apps like Snapseed or Lightroom Mobile.
Common Problems & Easy Fixes
As with any new skill, you’ll encounter a few hurdles. Here are solutions to the most common digiscoping challenges:
- Problem: There’s a Black Ring (Vignetting) Around My Photo.
- Solution: This means your phone camera isn’t perfectly aligned with the binocular’s light path, or the field of view is too wide. First, re-adjust your phone’s position in the adapter. If the ring persists, gently use your phone’s digital zoom (pinch out on the screen) until the black ring disappears and the image fills the frame. Avoid zooming too much, as it degrades quality.
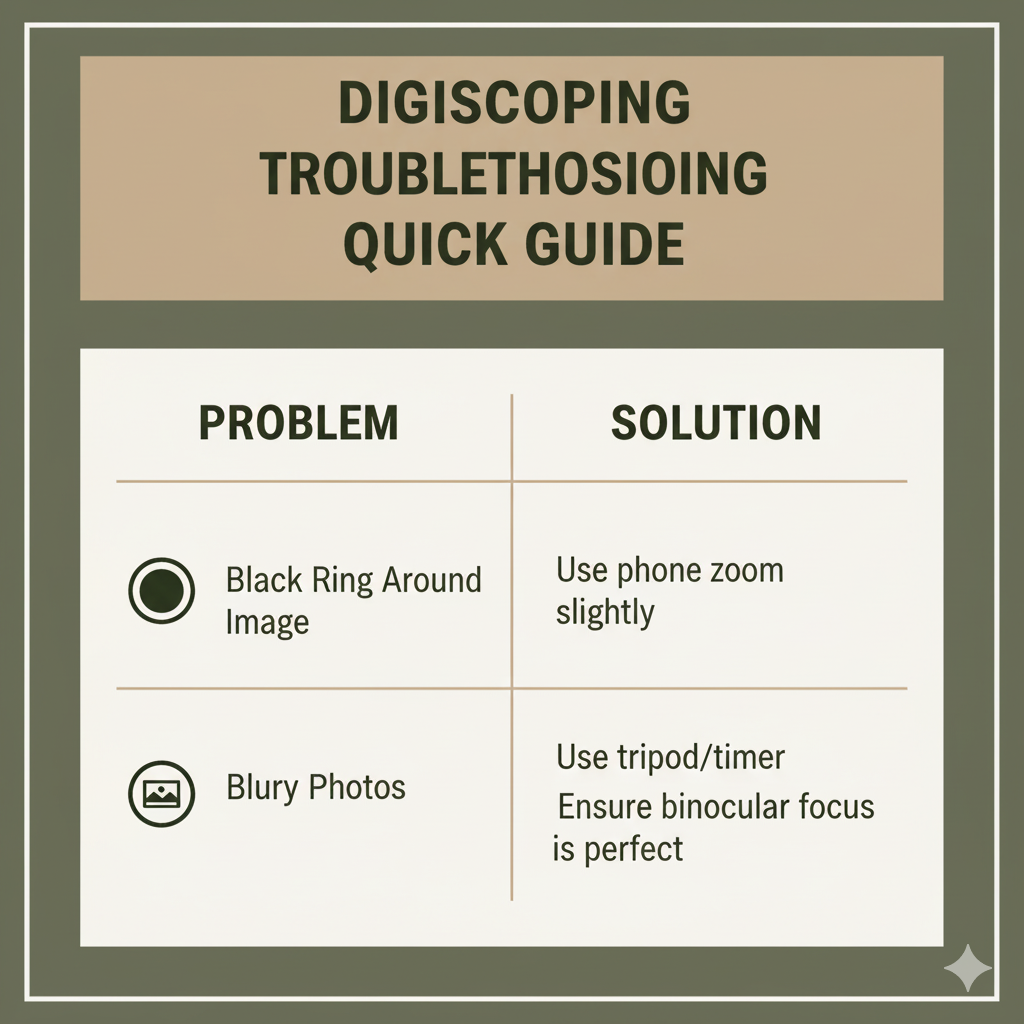
- Problem: My Photos Are Blurry.
- Solution: This is almost always due to one of two things: camera shake or improper focus.
- Camera Shake: If you’re not using a tripod, start there. Even with a tripod, use your phone’s self-timer or a Bluetooth remote to eliminate any hand vibrations when pressing the shutter button.
- Improper Focus: Ensure your binoculars are perfectly focused on your subject before you fine-tune with your phone’s autofocus. Sometimes, the phone might try to focus on dust on the binocular eyepiece or another element. Manually tap to focus on the subject on your phone’s screen.
- Solution: This is almost always due to one of two things: camera shake or improper focus.
Conclusion
Digiscoping opens up a thrilling new dimension for any wildlife lover. What starts as a clever “hack” to get amazing photos with the gear you already have quickly becomes a rewarding skill. You can now capture those incredible, fleeting moments in nature, turning distant observations into tangible memories. Wildlife photography on a budget has never been more accessible or exciting!
Like any photography technique, practice is the key to mastering digiscoping. The more you experiment with alignment, focus, lighting, and stability, the sharper and more stunning your photos will become. So, grab your binoculars, mount your smartphone, and get ready to document the wild world around you. Happy digiscoping!